By Alex Kozora
Breakdown of the snaps played by Pittsburgh Steelers defensive end Ziggy Hood versus the Green Bay Packers.
CLICK ON ANY PICTURE TO ENLARGE
First Drive
Snaps: 8
Run: 3
Rush: 5
Play-by-Play
1. 1st and 10, 9:21 1st. At left DE, where he’ll be the entire game. Pass rush, solo against the center. Gets himself a bit overextended here (picture below). Hard to generate much power, has to carry lower half.

2. 2nd and 3, 8:55. Consider it a rush but a wrinkle to it. Initially engages but then rubs the H-Back Ryan Taylor coming out of the backfield and through the line. Then Hood starts looping to the other side before stopping as Matt Flynn releases the football.
3. 1st and 10, 8:27. Smoke screen that is dropped by Jarrett Boykin. Does show awareness getting his hands up to try and knock it down. Unsuccessful in that regard.
4. 2nd and 10, 8:24. Screen to James Starks who runs for 23. Ziggy is normally good at snuffing out screens but falls to the ground after right guard TJ Lang lets him go upfield off the snap, pushes him down, and proceeds to work his way downfield. Hood taken out of the play.
5. 1st and 10, 6:03. Back in after five plays off. Replaces Cam Heyward at LE. Run is away from him here so not much to say.
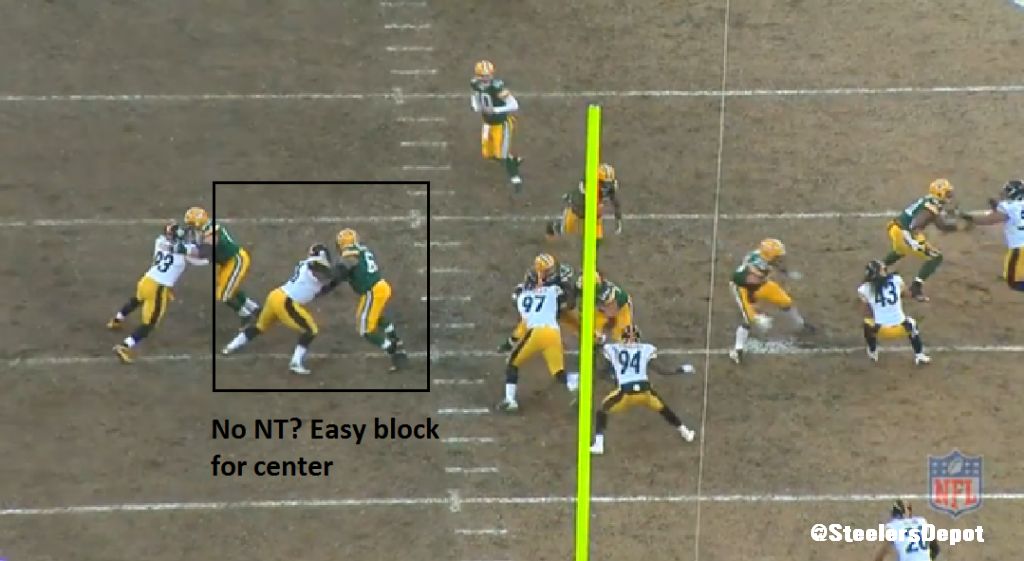
6. 2nd and 9, 5:23. Center easily able to seal him. Though Hood doesn’t make much of an effort to get off the block. Yet another example of why it would have been nice to have three down lineman. Block is much tougher with a nose tackle to account for. Even a 3-3-5 package would have been welcomed.
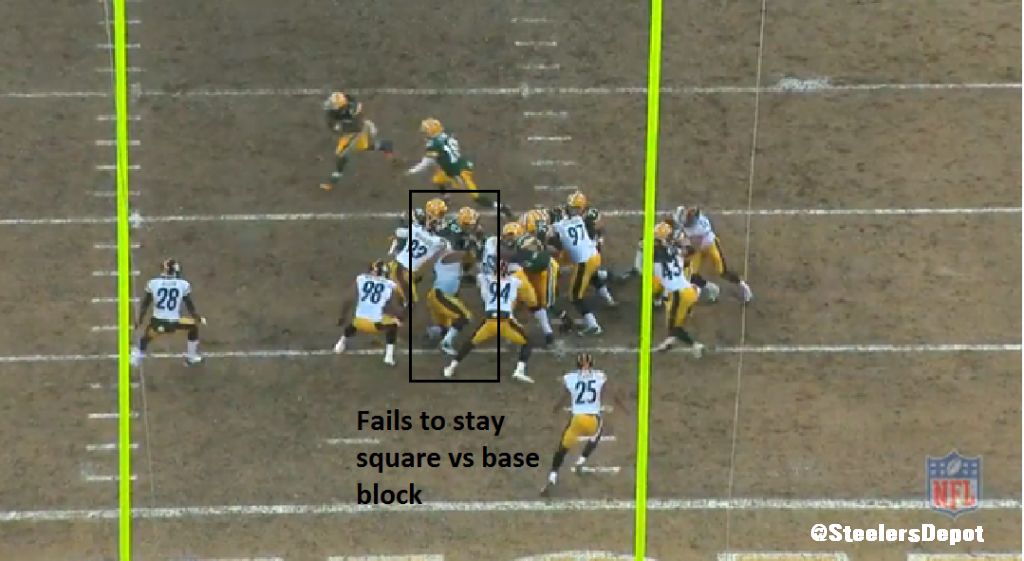
7. 3rd and 1, 4:45. Poor technique against this run. Solo by the RT, gets turned and collapses. Ok to do against double teams but no reason when base blocked. Have to stay square and hold the POA.
8. 1st and GL, 4:06. Rushes. Ball out quick on back shoulder TD to Boykin.
Second Drive
Snaps: 4
Run: 1
Rush: 3
Play-by-Play
1. 1st and 10, 8:12 2nd. Down blocked by the center on Power O. Run is away from him.
2. 1st and 20, 7:48. Lang absorbs Hood’s bull rush well. Ziggy gets under the right guards pads and gets him upright but simply isn’t the stronger player here. Good technique though.
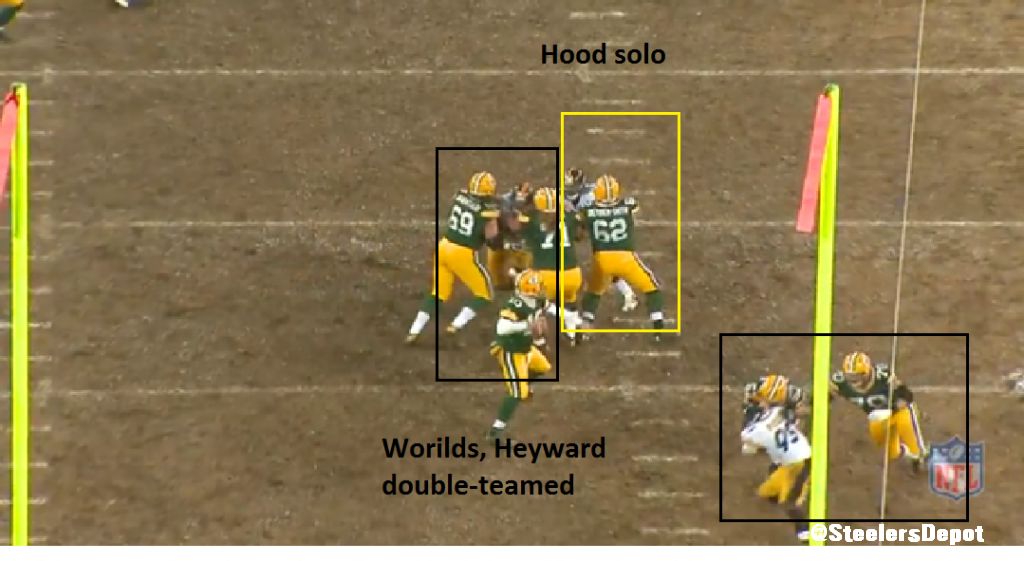
3. 2nd and 19, 7:08. Lined up over center, a true zero tech. Just a three man rush so not much happening. Worth noting that Heyward and Jason Worilds are double-teamed. Hood is not.
4. 2rd and 19, 7:07. Head over center again. Whole front five (defense in dime) reads and defends the screen well. Middle screen that is dropped by John Kuhn.
Third Drive
Snaps: 4
Run: 2
Rush: 2
Play-by-Play
1. 1st and 10, 4:42 2nd. Ball comes out quickly and Hood is slanting over a gap on his rush. Part of blitz package with Jason Worilds dropping and Vince Williams rushing from the other side. Hood does show good hustle running to the receiver and ends up getting an assist on the tackle.
2. 2nd and 6, 4:09. Repeat of the play above. Hood again slants to the outside. Worilds dropping and Lawrence Timmons rushing. Gets his hands up as Flynn throws the ball but does not knock it down.
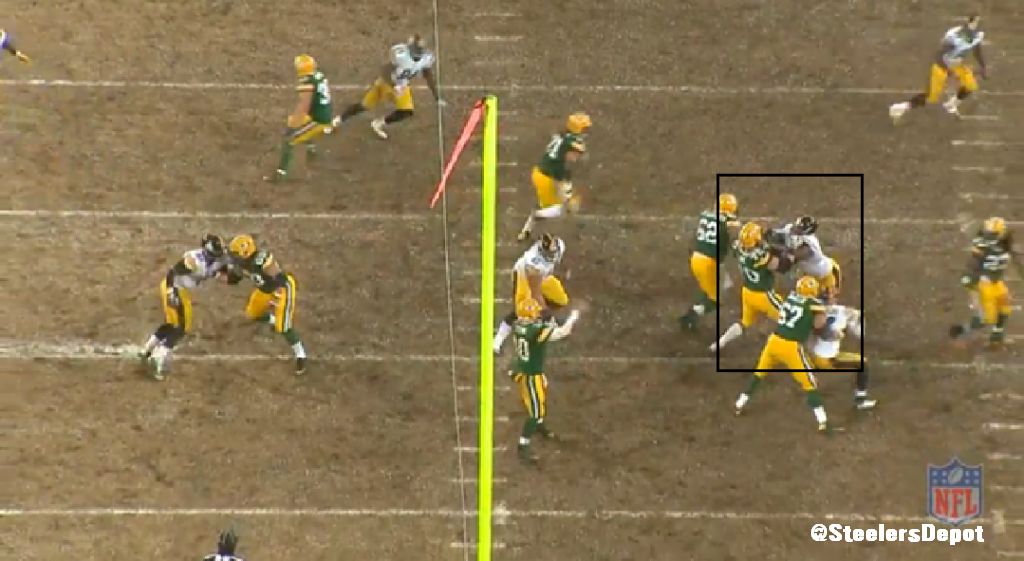
3. 1st and 10, 2:11. Good gets blown back off the snap. Partially to barely being in his stance after pointing to communicate with Brett Keisel. Lang can’t hold his block but does his job and Eddie Lacy shows some quick feet en route to an 11 yard gain.
4. 1st and 10, 2:00. Zone run that Lacy cuts back, away from Hood’s side.
Fourth Drive
Snaps: 7
Run: 3
Rush: 4
Play-by-Play
1. 1st and 10, 10:42 3rd. Zone run to the right. Hood does a nice job of filling his gap and not letting Lang run him down the line. Forces Starks to cut up inside. All you can ask for when defending zone schemes.
2. 2nd and 6, 10:10. Initially solo block from the RG on this pass rush but then chipped by the center, knocking the end off balance.
3. 3rd and 6, 1005. Again, rushes over a gap with the OLB dropping. Think that’s primarily to contain the QB. Is able to knock RT Donny Barclay’s hands away and slip past. Stevenson Sylvester gets to the QB first, however.
4. 3rd and 6, 9:35. Scrape with Chris Carter. Hood slants to the outside and Carter replaces Hood’s gap. Run is away from him.
5. 1st and 10, 8:45. Hood back in after two snaps off. Screen and Hood, the weakside end to it, correctly rushes the QB while Steve McClendon defends the back. Able to pressure Flynn and forces him to throw the ball into the ground.
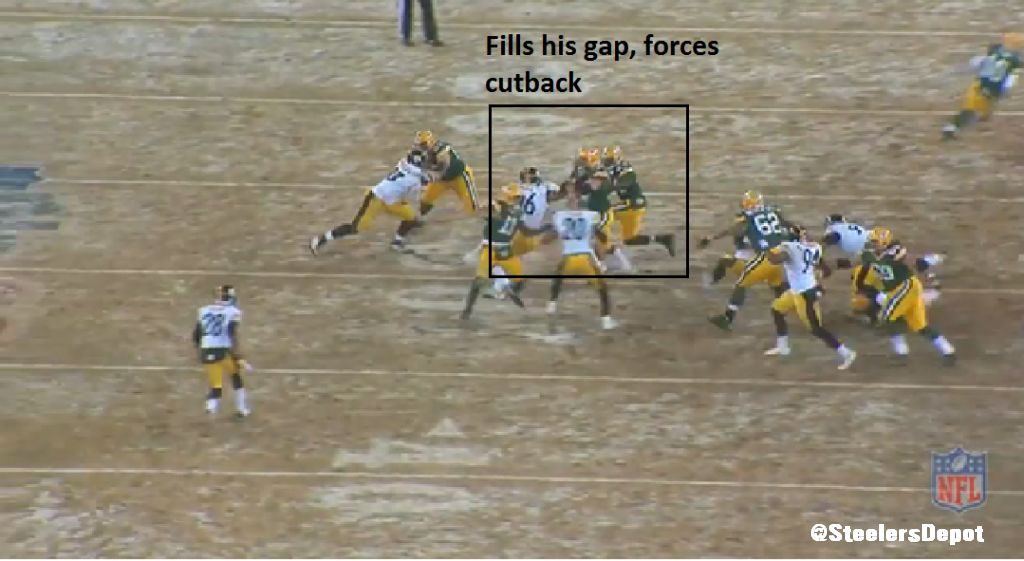
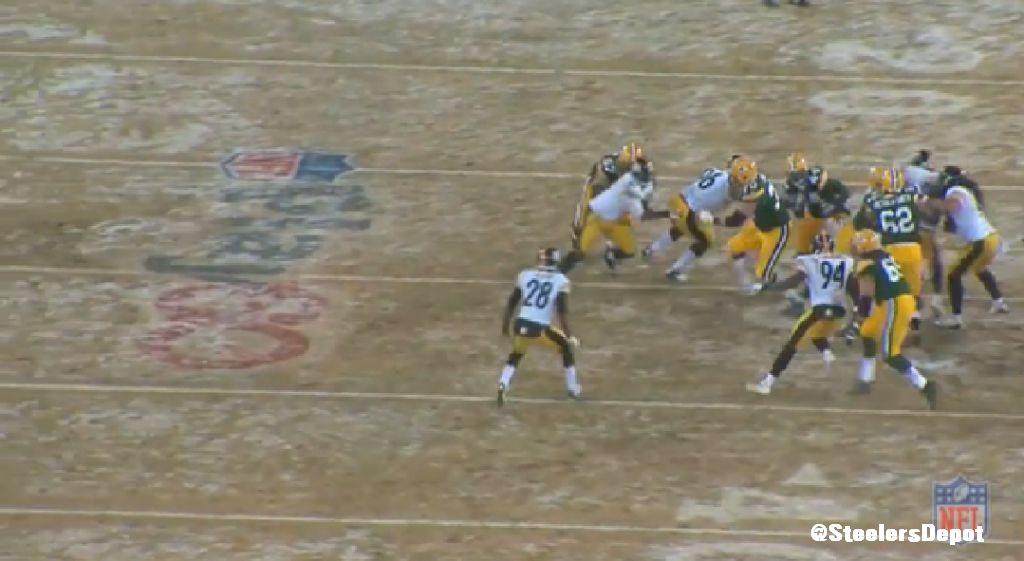
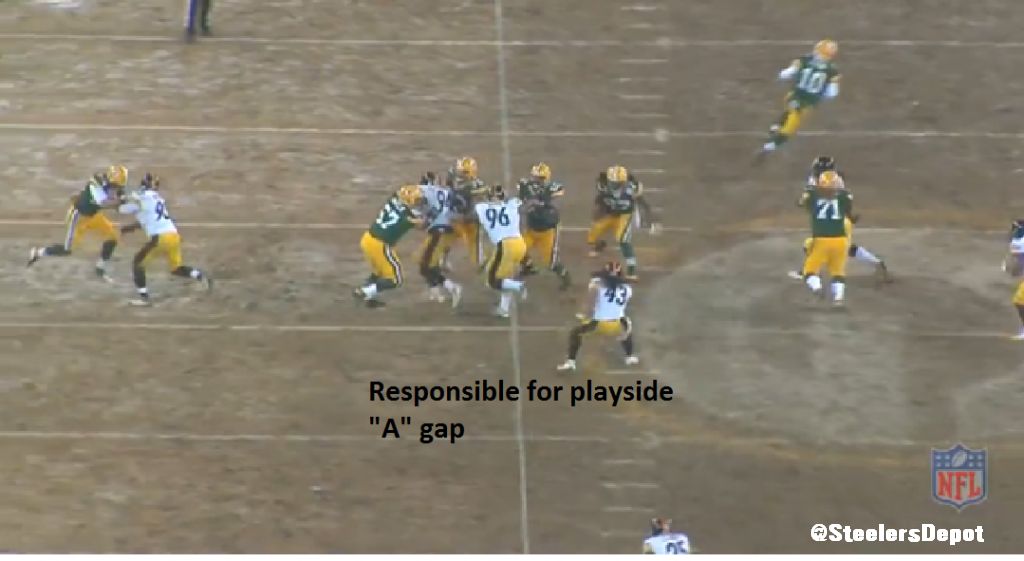
6. 2nd and 10, 8:40. Zone run. At first glance, Hood may look bad for getting pushed down the line but in reality, it filling his gap and forcing the cutback. Has playside “A” responsibility.
7. 3rd and 7, 8:06. Cross stunt with Heyward but can’t elude the center.
Fifth Drive
Snaps: 4
Run: 2
Rush: 2
Play-by-Play
1. 1st and Goal, 6:26 3rd. Holds POA well vs Barclay on run. Real good job here.
2. 2nd and Goal, 5:45. Catches a break as Lang gets overextended off the snap and Hood sheds. But Flynn rolls away from him so he can’t get much pressure.
3. 3rd and Goal, 5:37. Shows a swim move to work over Lang but runs into the center, who blocks him until Lang is able to rejoin the party.
4. 1st and Goal, 5:23. Seemingly falls on his own after the snaps. Turns and collapses. Guess he was expecting a double-team but it never comes and Barclay has an easy downblock. Lacy runs for a TD.

Sixth Drive
Snaps: 3
Run: 2
Rush: 1
Play-by-Play
1. 1st and 10, 13:25 4th. Zone run. Pushed off the ball and sealed by the right guard.
2. 2nd and 6, 12:50. Base blocked by Lang. Not much doing on this dive up the middle.
3. 3rd and 4, 12:12. Rush but ball thrown quick on fade route.
Seventh Drive
Snaps: 3
Run: 3
Rush: 0
Play-by-Play
1. 1st and 10, 8:39 4th. Another zone run the RB cuts back. Did get a good jump and showed proper arm extension vs the RG. Doesn’t let himself get swallowed up, a key to defending zone runs.
2. 2nd and 4, 7:56. Gets off the block by Barclay but caught up in traffic and can’t rally to the RB running up the middle. Starks goes for nine.
3. 1st and Goal, 7:17. Barclay able to hit his outside shoulder and keeps the end to the inside, allowing John Kuhn to score.
Total/Conclusions
Snaps: 33
Run: 16
Rush: 17
Bit of a ho-hum day from Ziggy Hood. Nothing too terrible but nothing too great. A bit funny that he showed good technique and filled his gaps against the more difficult zone runs but struggled technique wise against power schemes. Best thing to love about Hood, and this is speaking more generally than just from Sunday’s game, is his motor. According to him, inspired by seeing Brett Keisel work his tail off on tape, Hood doesn’t quit on many plays. As of now, I anticipate him coming back to start at left end with the team letting Brett Keisel walk. Just wish Hood was a little more versatile. He has taken only one or two snaps at RE all year long.