The “Mesh” passing scheme is one of the most common and effective concepts in football. It allows receivers to quickly out leverage defenders in Man coverage, it creates open areas and soft spots in Zone defenses, and it gives the quarterback clear and simple reads that lead to easy completions. Given the frequency and success that the Pittsburgh Steelers run this concept, I wanted to give a more detailed explanation of how the play is intended to work.
Play Design
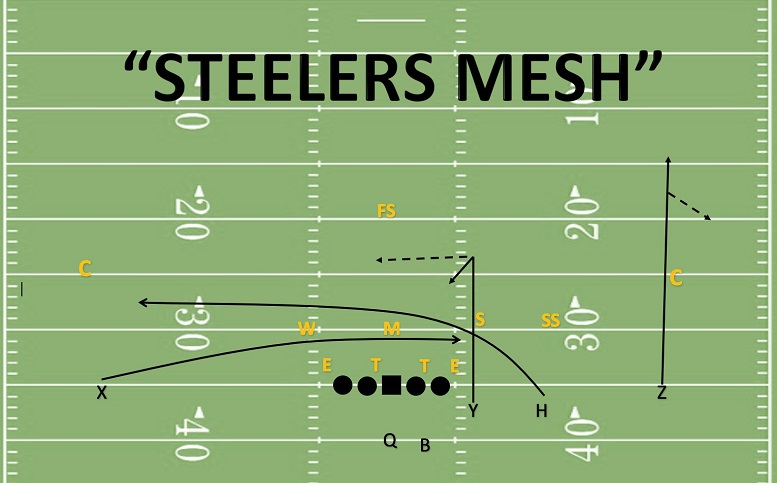
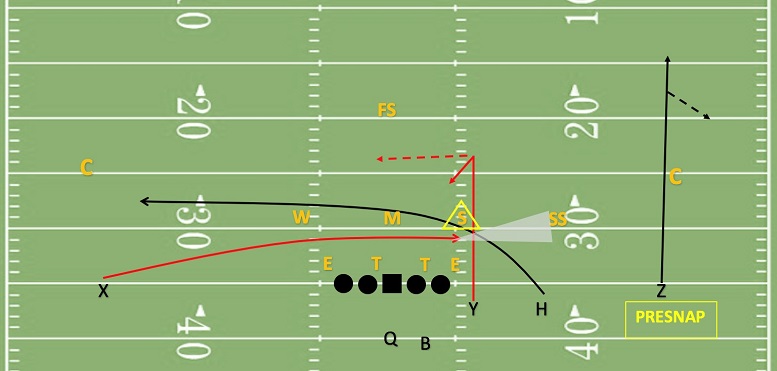
Traditionally, Mesh is a simple double-crosser scheme that requires the “top” crosser (the “H” in the diagram above) to rub the defender away from the underneath crossing pattern (here the “X”). In Zone defenses (where there is no pursing defender for the top crosser to screen) the underneath crosser simply looks for the vacated area on the opposite side of the field.
The Steelers add their personal touch to this play by having a tight end (the “Y”) run a Curl pattern on the side opposite the underneath crosser. Against Man coverage, the Y’s route is normally converted to a Dig. Additionally, the play-side outside receiver (here the “Z”) usually runs a deep clearing pattern, which can be converted to comeback or corner depending on the coverage. Lastly, the running back (here the “B”) usually helps in protection, with an option to release as a check down, if necessary.
The primary advantage of this scheme is that it is highly versatile: It is schematically sound against virtually every coverage, it works well with a variety of personnel groupings, and it does not require major post-snap route adjustments by the receivers.
Quarterback’s Read Progression
Pre-Snap:
As always, the Quarterback begins the play with a preliminary identification of the defense and a judgment as to whether his pre-snap alert route (the “Z”) is a viable option. In the Steelers’ version of Mesh, the alert route has typically been either a straight vertical or a comeback; however, against Jacksonville, Antonio Brown also once ran a Corner against a Cover 2-Man shell.
It’s difficult to determine the team’s exact rules for the alert route, but my sense is that there is either a pre-snap hand signal for Ben Roethlisberger to his receiver or there is a predetermined route adjustment based on the safety alignment. For example, against a single-high safety look, the alert route might run a Vertical/Comeback adjustment (Vertical if the WR can eat up the DB’s cushion; Comeback if he can’t). Against a two-high safety coverage, there is probably a Vertical/Corner adjustment (Vertical if the WR can close the DB’s cushion; Corner if he can’t).
Understanding Roethlisberger’s progression and pre-snap thought process is important because it helps explain why he sometimes misses seemingly wide open receivers. For example, below is a clip from the Steelers’ Week 2 matchup against the Vikings where he opts to throw an alert Corner route, even though he has JuJu Smith-Schuster wide-open on the underneath crosser. Although it’s easy to criticize Roethlisberger in hindsight for missing JuJu, I don’t think his decision to throw to Antonio Brown was necessarily that objectionable. Ben saw a two-high safety alignment and he had his best receiver going against Man-coverage on a field-side, out-breaking route. Those are all favorable conditions under both the pre- and post-snap defensive looks and normally leads to a positive outcome. While it’s never good for a QB to become completely robotic in his reads, it is also a recipe for disaster to skip on seemingly promising opportunities. Just to be clear, when analyzing Roethlisberger’s performance on a given play, it is important not to be results oriented. Proper assessment requires looking at the play from his perspective, and I think that in this clip his decision making was completely reasonable:
Post-Snap:
If Roethlisberger doesn’t like the look of his pre-snap alert route, his next step in a Mesh play is to locate the Sam Linebacker. (In the diagram at the top of this section, the Sam Backer read-key is highlighted in the yellow triangle). It’s important to note that the “Sam” might not actually be a linebacker for the purposes of his read progression. Instead, Roethlisberger must identify the defensive player who has the responsibilities of the Sam backer. This will make more sense in a minute.
Additionally, one important aspect of the play is the crossing receiver’s responsibility to also read the coverage during his route. Specifically, when the defense is in Zone coverage, the crossing receiver must keep his eyes on the cornerback located on the opposite side of the field. If the corner drops deep downfield, the receiver can continue his route normally. However, if the cornerback sits in the flats, the receiver needs to throttle down his route and find the soft spot in the zone. (This rule is represented by the gray, transparent triangle in the diagram above).
After identifying the proper player to read, the play is pretty straightforward for the quarterback: If the Sam drops in coverage and vacates the underneath zone, then Roethlisberger will throw to the underneath crosser. Conversely, if the Sam stays in place or moves towards the line of scrimmage to stop the crosser, then Roethlisberger will throw to the Y-Curl. Below are examples of completions to each route.
First against Chicago, Roethlisberger sees the Sam drop in coverage and correctly responds by hitting AB on the underneath crosser. Simple, easy read:
On this next play against the Vikings, the read is slightly more complicated because the Sam comes on a blitz. This is an example of Roethlisberger needing to identify not who the Sam is pre-snap, but instead the defensive player who has the Sam linebacker’s post-snap coverage responsibilities. After the blitz, Ben quickly locates his new post-snap read key and correctly targets Jesse James on the Y-Curl:
Wrinkles
Todd Haley has done a good job of being creative and adding wrinkles to his Mesh play designs. For example, on this next clip against Jacksonville, Le’Veon Bell runs what is essentially the underneath crossing route, even though he does so by coming out of the backfield. The read for Roethlisberger is exactly the same, but the play looks totally different to the defense:
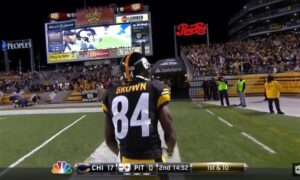
Lastly, this final clip is the play that sparked Antonio Brown’s infamous Gatorade cooler sideline tantrum. It starts as a standard Mesh look, but AB does a fantastic job of using the top crossing route to screen his over-pursuing defender. It is really bizarre that this play failed, given that it was unquestionably designed to be thrown to AB. The only explanation that I can imagine is that this play was created as an in-game adjustment and Roethlisberger was simply not comfortable with its timing, spacing, and feel. This seems unlikely though, considering the reactions of both AB and Haley in the play’s aftermath: